How to Upload a Video in Streeam
"Live streaming: where do I even brainstorm?" Without having a basic understanding of how live streaming works, getting started can be intimidating.
If you want to:
- Start streaming using something more than just your webcam or smartphone
- Understand the primal components of online video streaming
- Learn the basics of alive streaming chop-chop
So you've landed on the right page.
Leap to
What you'll need to commencement alive streaming:
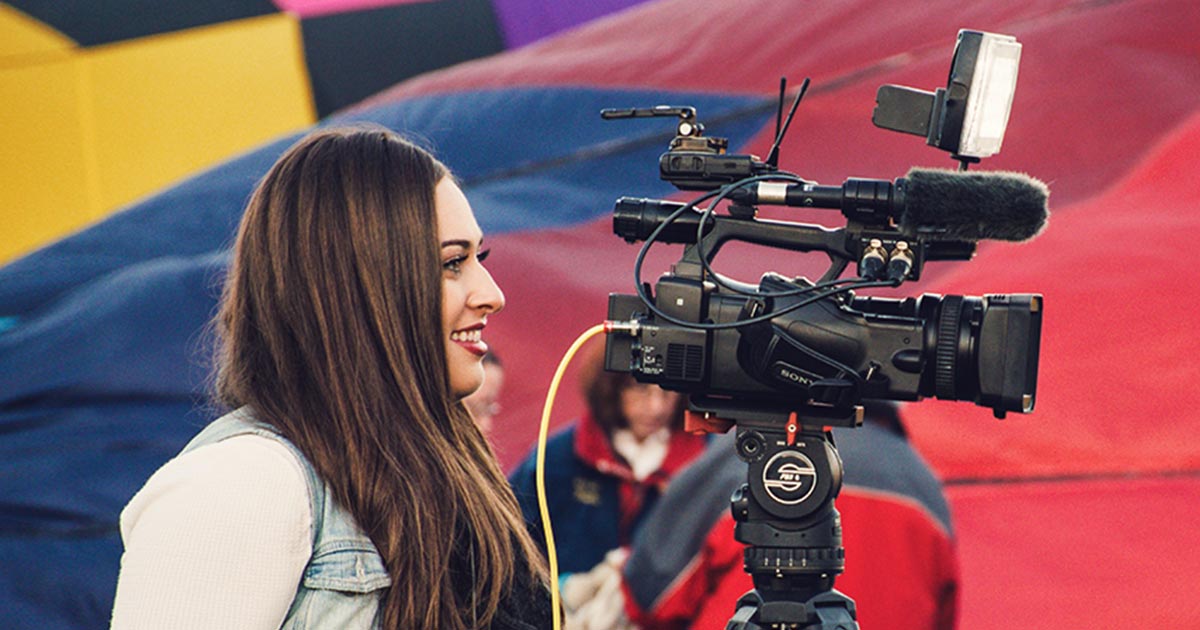
- Video and sound source(southward) – These are cameras, computer screens, and other image sources to exist shown, too as microphones, mixer feeds, and other sounds to be played in the stream.
- A video encoder – This is the reckoner software or standalone hardware device that packages real-fourth dimension video and sends it to the Net.
- A streaming destination – The identify your live video will become available online. Pop ones include YouTube, Vimeo, and Facebook Live.
- A stable Net connection – So your stream doesn't freeze, buffer, or drop off entirely.

The basic setup and menses of a alive stream
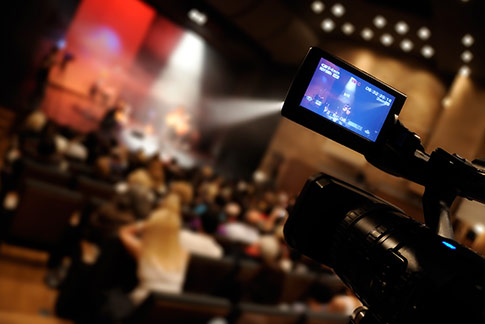
1. Video and audio sources
A stream of video information (from a camera, for example) for your alive stream is called a video source. Respectively, a stream of sound data is an audio source. A simple stream might consist of just one video and audio source, while a more complex one may have ii or more sound and video sources involved. Different combinations of video and audio sources are referred to as "scenes" or "layouts" (think total screen, flick-in-motion-picture show, or side-by-side layouts).
The video source(south) for a live stream may come from a:
- DSLR camera
- Camcorder
- Computer screen
- Webcam
- PTZ camera
- Phone or tablet photographic camera
For live streaming, you practice not need to accept a storage carte in your camera.
Audio sources may come up from a lapel, handheld, or USB microphone, or from an audio file. If you run your microphone indicate through your photographic camera, the audio will come embedded in your video source, which means they will arrive together through one cablevision. This is a very common manner to capture audio.
Always exist mindful of the background music in your live stream considering online video platforms can monitor and flag copyrighted content. You may receive a copyright violation or fifty-fifty be banned from streaming.
Learn more than about choosing a camera for alive streaming:
Best cameras for alive streaming for any budget (updated for 2022)
Read more
How to capture audio and video sources
In social club to start streaming online, you will need to capture the betoken from your audio and video sources. Most video sources today apply HDMI™ or SDI outs for external connexion. Both HDMI™ and SDI cables are able to acquit embedded sound forth with video. If you are using a estimator with a software encoder to stream, then simply connecting a camera to a computer using an HDMI™ or a SDI cable will not piece of work. You will need an intermediary device called a capture bill of fare. A capture bill of fare (like AV.io HD for example) connects to the camera on one side, and to the calculator over USB on the other, capturing exactly what the photographic camera "sees." Nearly hardware encoders, on the other mitt, come up with internal capture cards, then you can connect video sources direct. We volition talk more about streaming software and hardware below.
If you lot are using a USB camera or microphone, however, you can expect to capture these signals past simply connecting them direct to a estimator.
2. Video encoder
What is a video encoder and why practice I demand one?
An encoder "translates" the video point for the Internet. An encoder is a piece of software that compresses and converts the incoming audio-video signal into a digital, web-friendly format. You need an encoder because nigh video sources don't come fix for live streaming: video cameras are made for recording large and bulky video files, not intended for streaming in real time.
Types of encoders
Essentially, today you have the option of going alive from three types of encoding devices: mobile telephone/tablet, a computer with streaming software installed, or a dedicated hardware encoder. While a mobile phone may be an all-in-one video source and encoding device, the live product capabilities offered by a mobile device are extremely limited. Let's focus on the encoding tools that are able to handle more professional alive streams, with the power to add multiple cameras and layouts.
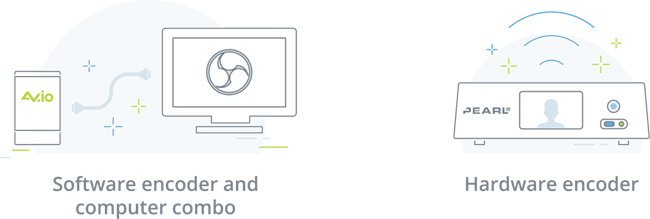
Software encoders
A software encoder is an installed application that uses your computer'southward resources (CPU) to neatly pack upwards the video and ship it online. As previously mentioned, a capture card is necessary to capture the video indicate from your source to your computer.
There is a wide variety of free and paid streaming software available, including Wirecast, vMix, Streamlabs OBS, the ever-popular OBS Studio, and many more. You tin learn all near the differences between them in our all-time streaming software commodity. OBS Studio is a good fashion to start learning about encoding because it's free to download and install, all settings are hands accessible, and there are many online tutorials to help you lot along.
It's important to remember that streaming software always takes a toll on the computer's CPU. This means that if your computer is non powerful enough to handle it, your viewers may feel buffering and dropped frames while you experience a very laggy computer. We recommend having a machine no lower than an Intel Core i5 2.viii GHz with 8GB memory for a good live streaming experience.
Hardware encoders
A hardware encoder (i.e., streaming hardware) is a dedicated device that handles all the encoding. Audio and video sources are connected straight to the hardware encoder, no capture cards required. Mod encoders are capable of taking in multiple video input formats, including HDMI™, SDI, VGA, and DVI, as well every bit XLR and 3.5 mm analog audio. Naturally, hardware encoders demand to be connected to the network (via Ethernet, or Wi-Fi, or cellular) in order to stream.
Hardware encoders can come in different shapes, sizes, functionality, and price points. Some are small and portable, with the ability to take in merely i or two video sources (east.g., Webcaster X2). Some are designed to be taken on the route: these apply a bonded cellular signal for an Internet connexion. Examples include Teradek VidiU and LiveU encoders. Others are much more than complex and powerful, able to accept in many video and sound sources, record, mix, scale, and switch between them. For example, Epiphan's Pearl-two and Pearl Mini are professional all-in-1 live production studios with incredibly vast functionality.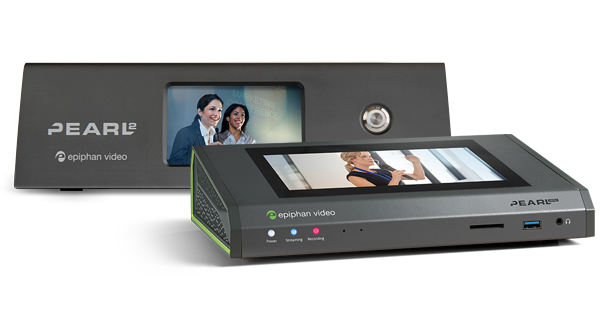
Pearl-two and Pearl Mini, examples of hardware encoders
In many means, hardware encoders are more user-friendly and reliable than using a personal computer with streaming software. Hardware encoders are specifically designed for live streaming. They besides gratuitous upwards your computer for other tasks.
Be sure to check out our streaming hardware vs software commodity if you lot want to acquire more than about choosing the right encoder for you lot.
Almost of import encoder settings
Both software and hardware encoders have like variable settings that bear on your live stream. Here are the about important ones to know:
Frame rate: How many frames per second are displayed, in frames per second (fps). Common inputs:10fps (outrageously low, infuriating to the human center frame rate),24 fps,30 fps (standard for digital video),60 fps (cute and lifelike).
Output resolution: Size of video frame, width x height, in pixels.
Here are some common resolution names and their aliases:
| Resolution shorthand | Dimensions, in pixels | Besides referred to as |
| 480p | 858×480 | SD or Standard Definition |
| 720p | 1280 x 720 | HD or "Hard disk drive Fix" |
| 1080p | 1920 ten 1080 | FHD or "Full Hard disk drive" |
| 1440p | 2560 x 1440 | QHD or Quad HD resolution |
| 4K or 2160p | 3840 x 2160 | UHD or Ultra Hard disk resolution |
The almost common resolution sizes used today are 720p and 1080p. These numbers refer to to number of pixels measured vertically. The "p" stands for "progressive scanning," and not for "pixel."
Bitrate: How much video data yous are uploading, per second. More often than not expressed in kilobits per second (Kbps), although megabits per second (Mbps) are also sometimes used. That'due south Kbps divided by roughly 1000.
General value range is 1000-8000 Kbps. Common values are g Kbps (absolute minimum for live streaming) 2500 Kbps, 3000 Kbps, 5000 Kbps. This number depends on frame charge per unit and resolution: the higher the frame rate and resolution, the higher the bitrate needs to exist for a smooth, high-quality live stream.
Codec: Refers to the method of compressing (encoding) audio and video data for faster transmission. H.264 is the nigh common one.
Keeping a fine balance between bitrate, frame rate, and output resolution is what makes a good stream. How high you tin can go depends largely on the type of encoder you lot use and your Internet bandwidth. For example, with sufficient bandwidth, a hardware encoder like Pearl-2 is able to stream 1080p resolution at lx fps without skipping a shell, whereas an older computer with streaming software may really struggle, dropping frames and causing buffering fifty-fifty with sufficient bandwidth.
3. Streaming destination
A streaming destination is the online site, platform, or app where your alive video becomes available to others. These destinations are more than commonly referred to as content delivery networks, or CDNs. Pop free CDNs include platforms like Youtube, Facebook Live, Twitch, and more than.
In that location are paid streaming platforms as well. These offering much more control over where and how your live stream is presented, who sees it, and whether and how the stream is monetized. CDNs like Vimeo, Vimeo Livestream, Dacast, StreamShark, and others offer different monthly plans. Costs depend on the corporeality of information in gigabytes you upload.
Gratis or paid, you will need to sign up and log into the CDN of your choice. Some platforms (YouTube) require you to go through a few additional steps and wait for 24 hours earlier you tin get-go live streaming.
Choosing a CDN (streaming destination)
Naturally, each CDN caters to a specific audition. As soon as y'all figure out what you are alive streaming and who your principal audience is, y'all can begin choosing a fitting CDN. Here are some examples:
- Twitch is mainly for gaming. Twitch is free to start, with additional tiers if you lot need them.
- Youtube (free) is for many things: personal, lifestyle, shows.
- Facebook (free) is for connecting with your community, sharing immediate news, equally well as growing your brand.
- More specialized paid CDNs like Dacast, StreamShark, and Vimeo Livestream are good for large events such every bit concerts and sports.
- Special platforms like Streamingchurch.tv (paid) are intended for live streaming church services and include many peripheral services.
Our advice would be to start with a free CDN, effigy out all the ins and outs, and and then movement on to a paid one, if y'all demand to. So yes, yous could potentially kickoff live streaming for free right at present! Be sure to check out this how to choose a CDN commodity for more detailed data near the differences between content delivery networks.
Set up an effect and fill out the description
A standard feature of an overwhelming bulk of CDNs is letting you decide between going alive right at present or scheduling to get live in the future. In either instance, you volition need to fill up out the live stream description, perchance cull a category for your stream, and add some tags. Using hashtags is a great way to bring viewers to your stream.
4. Stable Cyberspace connection
Getting a steady network connexion is often the trickiest office of alive streaming. Nosotros institute that the about reliable connection is a hardwired, defended Ethernet line. You lot tin, of form, go live using Wi-Fi or cellular (4G/LTE) Internet, but these types of indicate tend to fluctuate.
We can't stress how of import it is to perform a speed test beforehand. Nosotros recommend to always take approximately one.5x your stream's bitrate available to business relationship for these possible network fluctuations. For example, if your live stream has a fleck rate of five Mbps, then ensure you have at to the lowest degree 7.v Mbpsupload bandwidth bachelor to ensure a reliable live stream.
We go into much more detail almost the required Internet bandwidth for live streaming in a separate article. Exist sure to check information technology out.
How to live stream: v basic steps.
Essentially, the streaming setup workflow comes down to connecting your sources to the encoder, setting up your scenes (layouts) for switching, configuring a few encoder and streaming destination settings, and establishing a connection between the encoder and the streaming destination. Naturally, streaming destination and encoder user interfaces will differ from case to case, only the basic workflow remains the aforementioned. In the example below, we chose to bear witness the Pearl-2 UI for the encoder and YouTube UI for the streaming destination.
Pace 1. Connect your audio and video sources to the encoder.
Make sure everything has ability. Pro tip: whenever possible, utilize Ac power instead of battery ability, for all and any device, especially a camera. Placing your camera on a tripod is e'er a good idea. Use a capture card if you lot are using your reckoner with encoding software. No capture bill of fare necessary with hardware encoders similar Pearl-ii.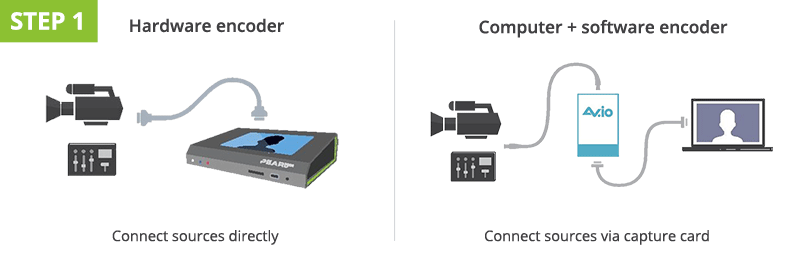
Step 2. Configure the encoder
If you plan to do switching betwixt a number of sources, go ahead and fix your layouts (scenes). So, configure the nigh important streaming settings: resolution, frame rate, and bitrate. If yous are unsure, start with 1280×720 resolution, 30 fps frame rate, and automatic or 3000 Kbps bitrate. Everything else tin pretty much exist left at default. With software like OBS you volition be configuring these settings in-app on your computer. With a hardware encoder on the other hand, you will need to admission the device's settings via Web UI or via an app. Create a new RTMP Push button stream.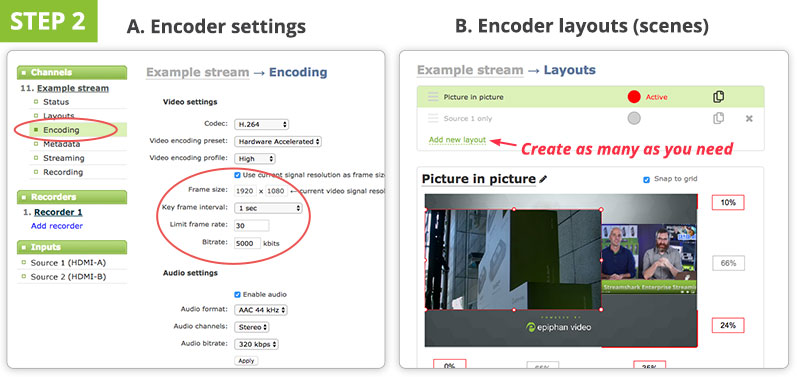
Step 3. Configure streaming destination settings
Log in to your alive streaming platform (i.e., streaming destination, or CDN) and prepare up a new alive streaming issue. Fill up out your stream description, configure privacy settings, etc.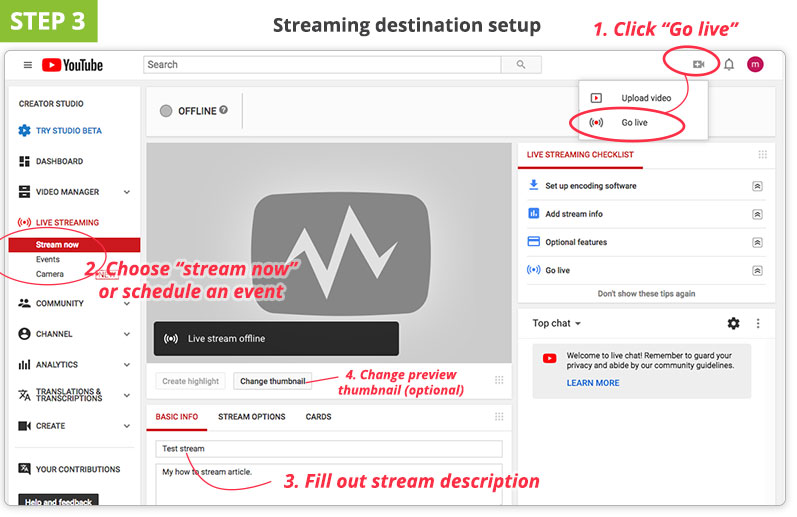
Step 4. Copy and paste URL and stream key from CDN into encoder
This is what actually ties your encoder and your streaming platform together. In guild to know where to get video data, the CDN needs to verify and connect with the encoder, while the encoder needs to know where to send the data. This is done using a special password shared between the two, called a stream name (or sometimes stream key). The stream name/primal is provided by the streaming platform (CDN). Go along this key safe, every bit those who know it may be able to stream to your business relationship.
The stream URL and key are usually found in CDN's advanced or encoder settings sections. Re-create the stream URL (looks like a web address) and the stream key from the CDN into the corresponding fields in the encoder UI. You tin leave the username/countersign fields blank. Click "Save" or "Employ."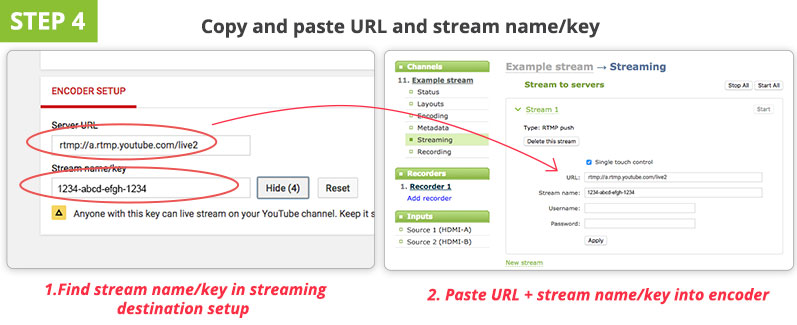
Footstep v. Click "Offset Streaming" on the encoder to go live
In one case you press "kickoff streaming" somewhere in the encoder UI, your CDN preview window should tell y'all that it is receiving signal from the encoder. There is mostly a lag of 10-30 seconds between the encoder and the live stream on the CDN.
Control live switching from the encoder UI. Recollect that yous demand to stop your stream also in the encoder UI.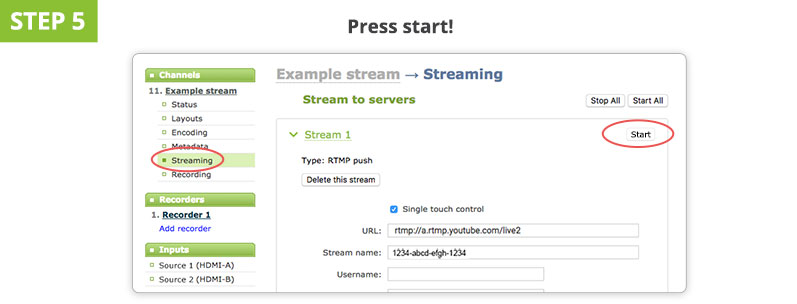
Pro tips
- Live streaming requires lots of prep work. Checking that you have extra batteries, testing the connection speed, and checking the sound should be role of every live stream preparation procedure.
- Examination your live stream on a dummy account/private channel showtime. Y'all volition acquire whether your bitrate is sufficient, how the picture looks, how you sound, and this will give you a chance to make tweaks.
- There are other important elements for a great live stream, such as having a nice set and good lighting. Once you've mastered all the basics, check out our live streaming studio essentials article to learn how to take it to the next level.
Be sure to bank check out our awesome best live streaming setups infographic. Information technology's a great tool for visualizing the diverse streaming setups.
Decision
Live streaming is a very wide topic, and each streaming case is unlike. This postal service was intended to exist a very general look at how to go live. We practice, withal, promise nosotros were able to provide some clarity almost the fundamentals of going alive and how to start live streaming. Understanding these basics along with some practice will help make your alive streams outstanding.
carusowastive1990.blogspot.com
Source: https://www.epiphan.com/blog/how-to-live-stream-for-beginners/
0 Response to "How to Upload a Video in Streeam"
Post a Comment